Honda Element Owners Club banner

Honda Element Buyer's Guide - Rust Inspection

31K views 36 replies 15 participants last post by  bigred05  
#1 ·
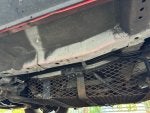
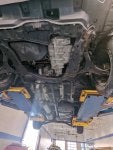
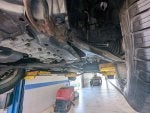
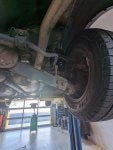
One of the most important parts of a pre-purchase inspection is an assessment of the underside for rust; particularly an E that has spent an appreciable amount of time in areas that use salt on the road in the winter. The area most vulnerable is the forward mount of the rear lower control arm, followed by the rocker boxes, and rear bumper beam. This is a compilation of areas to inspect for rust (some more accessible than others).
Note: This is a work in progress, the following sections will be populated with a description of the area and photos of rust damage compared to non-damaged photos (if possible).
Rear Lower Control Arm Mounting Points

Rear Spring Upper Seat

Rocker Box and Frame Boxes

Base of A Pillar

Base of B Pillar

Rear Bumper Beam

Rear Bumper Mounts

Engine Compartment Frame Boxes

Lower Edge of Doors

Windshield Frame
 
#2 · (Edited)
Rear Lower Control Arm Mounting Points

This is an extreme case in which the forward mount for the left rear lower control arm has rusted so badly that it has ripped out of the body. If an Element gets to this point it is only good for parts.
Image
Image


Image


Here is a good looking one:
Image


22 year old CA Element courtesy of @ajchien
Image
 
#4 · (Edited)
Rocker Box and Frame Boxes

These are closely related to the rear lower control arm mount; rust on the rocker boxes can be hidden by the rocker covers.
Image
Image


Looking up from underneath (floor section cut out of vehicle)
Image


What it should look like:

Image


Frame box just ahead of the spare tire well.
Image
 

Attachments

#31 ·
Rocker Box and Frame Boxes
Anybody ever repair a rusted out pinch weld under the floor where you attach your wheel jack? Not asking if it's smart. Asking how much trouble it was.

For instance, found this on reddit:

Cut off everything rusty and fabricate/weld in new pieces of steel. Very time consuming to recreate the original structures, there's usually two or three layers in this seam where the inner and outer rocker panel are joined. There's usually some intermediate reinforcing panels inside the rocker area...it can get quite complex.
I do kinda wonder if the [biggest] local welding shop would be game for something like that, but wanted to check in to set some expectations first if anyone's tried successfully.

(I mean, before the floodgates open, I agree. I think this is conventionally the best advice: "it's probably not worth fixing. Just try to get your money's worth out of this car, then sell it and buy a different one. might be a good parts car. If you are super attached to it, you can have it restored, but it won't be worth it financially" -- drive it until you're ready for something else or something goes wrong, then give it up. Man, salt is evil. 🤨)
 
#5 · (Edited)
Base of A Pillar and B Pillars

This is part of the reason you don't want to "hose" your Element out. The water will run to the edges of the flooring and end up underneath it. You would need to remove the door sill panels and lift the edges of the floor to inspect for this.

A pillars
Image
Image


B Pillars
Image
Image
 
#6 · (Edited)
Rear Bumper Beam

The rear bumper beam can be inspected by looking from underneath - it is typically the front and bottom that begins to rust through. The beam is relatively easy to replace assuming the four mounting nuts come off.

Image
Image


Rear bumper mounting structure.
Image
Image


Also take a look at the thin sheet metal that the top off the bumper cover slips into. Lift the flap between the floor and tailgate.

Image

Image
 
#7 · (Edited)
Engine Compartment Frame Boxes

I didn't get close ups. The area where the frame box protrudes from the bottom of the firewall is prone to rust because (IMHO) of the proximity to the openings for the tie rods that allows junk from the wheel wells to accumulate around the mounts for the steering rack.

Image
 
#20 ·
Windshield Frame This would be a tricky repair because of the structural beam under the roof at the front and tying into the A pillars. View attachment 218248 View attachment 218249 Photos of an intact section of the roof at the top of the windshield: View attachment 218355 View attachment 218356
I live in Florida, and don't have covered parking, so my vehicle sits in the rain quite a bit. Before getting rear-ended and totaled, I tried to get the windshield changed in my Element and the installer said he couldn't do it because he checked and thought there was probably rust under the top edge of the windshield, and I would have to get that taken care of first. Now that I'm looking for another Element, what could I do in the future to prevent this spot from rusting?
 
#10 · (Edited)
Suspension

The front engine/transmission cradle may exhibit a fair amount of rust; also pay attention to the oil pan - I've seen some that look like they're ready to rust through. The lower control arms are also rust prone.

Image


The rear suspension, more so than the front, is prone to rusting. The rear sway bar bushing bracket bolts seize and tend to break off when trying to remove them. The toe adjusters in the lower control arms seize. The lower strut bolts tend to seize in the integral nut at the bottom of the strut.

Image


A good looking 22 year old CA E care of @ajchien
Image


What it looks like with all new parts
Image
 
#11 ·
Thanks fleetwood for the pics of it all cut up! I noticed the clip holes for the sill plates, and decided to squirt in some fluid film using their spray tube/nozzle. Super easy to pop up the sill plates and got into the far corners. Hope this keeps the rust to a minimum. A few years back I sprayed into the lower control arm mounts, there are holes in the floor pan.
Did you notice any other rust prone body areas, that could be sprayed into?
 
  • Like
Reactions: te1966
#12 ·
So I just picked up an '05 AWD MT, and a large part of the purchase decision was informed by this thread, and the fact that my pretty-high-miles E was very, very clean underneath. Only very light rust, with many floor areas still paint-protected. And even though it'll be driven in the winter in Ohio, I'd like to keep it that way as much as I can.

I often use Fluid Film on other vehicles/equipment, but on the E, should I wire-brush and use a rust converter first, or go straight to FF soaking? (Not sure how long the nice weather will hold out here, too.) FF says to renew annually, so does that mean it's 'gone' enough to paint over in a year? Or are commercial processes, like "Ziebart" the way to go?

I think I want to stay away from epoxy products because they might conceal future problems whilst protecting. Haven't used them before (POR-15 and the like.)

"Chip"
 
#14 ·
I’m looking to purchase an 06 element and I’m wondering if this is a reasonable amount of rust for something with 100k miles. Thank you for your help!
 

Attachments

#17 ·
Great pics! Thank you Fleetwood! Im trying to learn!! Appreciate all the help here! Meanwhile I’m looking at a 2016 Toyota Highlander Hybrid to buy, and snapped this photo from under rear portion of car around level of axle. What is this rusted part, and should I walk away? It’s got 41k miles, all its oil changes, but driven back and forth from San Francisco to Utah multiple times since original purchase. Those damn salted roads. I’m so spoiled with CA cars… My 2010 Element has zero rust! Anyway, all help much appreciated.
Image

Image
 
#25 ·
I knew the TRA mounts were a problem area so I did look at them. The driver's side is a little rusty but not even close to fatal.

I think this will be an easy repair. The spot doesn't show (it's covered by the fender liner) and it is fairly localized. A little cutting and grinding should clean it up. Bend a little sheet metal and weld it right over the top. There are a couple holes right there, it will be easy to get in with some spray schmutz to seal up the backside. Rustoleum on the front. Done.
 
#26 ·
I knew the TRA mounts were a problem area so I did look at them. The driver's side is a little rusty but not even close to fatal.

I think this will be an easy repair. The spot doesn't show (it's covered by the fender liner) and it is fairly localized. A little cutting and grinding should clean it up. Bend a little sheet metal and weld it right over the top. There are a couple holes right there, it will be easy to get in with some spray schmutz to seal up the backside. Rustoleum on the front. Done.
Glad to hear that! :)

It's really odd that it is so bad; but only in just that one spot! The surrounding area looks really clean.
 
This post has been deleted
#29 ·
Always living out west, I get to just laugh at these pics. Realistically, You all would do better buying a west coast car and having it shipped east for circa $1000. Out west. Any rust, even surface rust makes a vehicle fall into the unsellable category! There is no such thing as "acceptable level of rust" here. I bet I could take any of my older vehicles back east and get an immediate 20% plus premium on them just for being rust free
 
#32 ·
How advanced or problematic is this amount of rust on a 2005? Obviously not ideal but it hasn't caused any issues and it seems like with some rust prevention treatment and/or a move to a drier/salt free environment it wouldn't progress further or cause problems.
 

Attachments

#34 ·
When I see pictures like this I really get envious - we NEVER see undercarriages in such a clean condition on any cars older than 5 years here in the rust belt, unless they've been undercoated. Just check the rear suspension trailing arm attachment like Fleetwood said and tap on the area to sound it out to make sure it's still solid. When rust proofing, make sure to inject the cavities generously before you shoot the exterior. On a slightly rusted vehicle like this one it should take less than 3 quarts of Fluid Film or similar product. Rust has a rougher surface so it needs a thicker layer to do its job.