Ok, so I got to thinking. I want a roof rack. I don't want to pay whatever outrageous price someone charges me for injection-molded plastic and some cheap aluminum. I want something that'll LAST and that'll be able to hold up more than the roof. Soooooo...I gots me all these tools, why don't I MAKE one?
And there was the genesis of an entire weekend of time...
Difficulty: Cakewalk..........Medium......*..Expert
(rated expert for major tool usage/owning)
Things you will need:
Cut-off saw or Sawzall or hacksaw and some HUGE arms
Drill press
Rat tail file (for cleaning drilled holes)
Flat file
3/8" x 1" bolts, washers, lock washers, nuts
1/4" x 2" hex cap bolts, washers, lock washers, nuts
12 stainless steel (reccommended) 6mm x 16mm hex cap bolts and lock washers
One 4' piece of 1 1/4" x 1 1/4" angle iron
2 cross bars of your choosing (I used 5' slotted square steel tube sawed to 54")
Good drill bits (cobalt reccommended)
Paint of your choice
Other crap to attach to the rack
1. Download and print out 2 copies of this file:
View attachment RoofRackBracketLayout x 4 - modified.pdf
2. Cut out the 4 strips, leaving them connected the long way, fold on the dotted line, and tape them to the inside of the angle iron:
![]()
3. Cut the angle iron into pieces the size of the double brackets:
![]()
4. Drill through the paper and bracket at the spots marked. The larger holes are 3/8" and the smaller holes are 9/32". NOTE: You only make 2 sets with all of the smaller holes, these are for attaching to the roof. For the other 2 sets, only drill the middle small hole:
![]()
5. Cut the brackets apart now into 2 equal-sized pieces. They should be 4 3/4" each.
![]()
6. File out the holes to remove any excess metal using the rat tail file and file all edges with the flat file.
7. Paint the brackets with rust-resistant paint. I used black Plasti-Dip. Be sure to clean them with alcohol or mineral spirits first since the steel will be oiled prior to shipping.
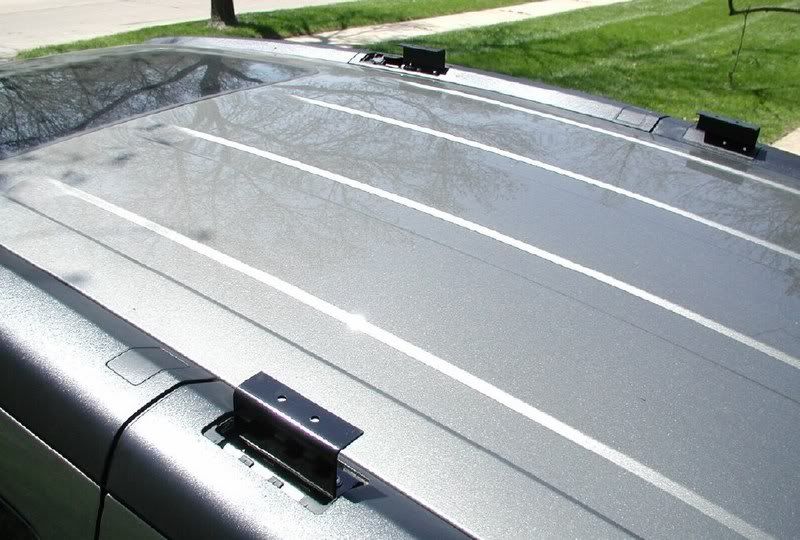
8. Remove the small covers on the roof edging to expose 3 bolt holes each.
9. Attach one lower bracket to each mount point using the 6mm bolts and a lock washer, then attach the upper bracket to the lower one to form a Z shape with 2 3/8" x 1 bolts. It should look like this: (sorry no intermediate pics, I kinda got carried away...)
![]()
10. Get your cross bars and attach them to the brackets. Since I used slotted square tube steel, I used 1/4" bolts to bolt through. If you want to use round pipe instead, use a U bolt and drill appropriate holes.
11. Get a beer, you're done!
**Pic Coming Soon!**
![Image]()
I chose the slotted tubing so that I can attach a lot of things to it by simple bolting. One thing I wanted on it was rope cleats for tiedown:
**Pic Coming Soon!**
![Image]()
Feel free to use and improve on the plans! I have some leftover angle iron and if someone wants a set of brackets to mount whatever but lacks the tools, I could make a set for probably $30 or so (painting extra, I hate painting...). Note these brackets can be used to mount just about anything you want, and can be customized for whatever bolt-on mounting you may need.
If anyone wants a copy of the master CAD file, just PM me for the file and a link to the software I made it in.
This is my first time attempting any fabrication with metal/steel so I'd really appreciate any comments or suggestions people could have! Please be kind though, I know my metal fab skillz are lacking...
Thanks to PaulJ for inspiration and "general look", I admit I kinda ripped him off. Please don't hurt me!
And there was the genesis of an entire weekend of time...
Difficulty: Cakewalk..........Medium......*..Expert
(rated expert for major tool usage/owning)
Things you will need:
Cut-off saw or Sawzall or hacksaw and some HUGE arms
Drill press
Rat tail file (for cleaning drilled holes)
Flat file
3/8" x 1" bolts, washers, lock washers, nuts
1/4" x 2" hex cap bolts, washers, lock washers, nuts
12 stainless steel (reccommended) 6mm x 16mm hex cap bolts and lock washers
One 4' piece of 1 1/4" x 1 1/4" angle iron
2 cross bars of your choosing (I used 5' slotted square steel tube sawed to 54")
Good drill bits (cobalt reccommended)
Paint of your choice
Other crap to attach to the rack
1. Download and print out 2 copies of this file:
View attachment RoofRackBracketLayout x 4 - modified.pdf
2. Cut out the 4 strips, leaving them connected the long way, fold on the dotted line, and tape them to the inside of the angle iron:

3. Cut the angle iron into pieces the size of the double brackets:

4. Drill through the paper and bracket at the spots marked. The larger holes are 3/8" and the smaller holes are 9/32". NOTE: You only make 2 sets with all of the smaller holes, these are for attaching to the roof. For the other 2 sets, only drill the middle small hole:

5. Cut the brackets apart now into 2 equal-sized pieces. They should be 4 3/4" each.

6. File out the holes to remove any excess metal using the rat tail file and file all edges with the flat file.
7. Paint the brackets with rust-resistant paint. I used black Plasti-Dip. Be sure to clean them with alcohol or mineral spirits first since the steel will be oiled prior to shipping.
8. Remove the small covers on the roof edging to expose 3 bolt holes each.
9. Attach one lower bracket to each mount point using the 6mm bolts and a lock washer, then attach the upper bracket to the lower one to form a Z shape with 2 3/8" x 1 bolts. It should look like this: (sorry no intermediate pics, I kinda got carried away...)

10. Get your cross bars and attach them to the brackets. Since I used slotted square tube steel, I used 1/4" bolts to bolt through. If you want to use round pipe instead, use a U bolt and drill appropriate holes.
11. Get a beer, you're done!
**Pic Coming Soon!**

I chose the slotted tubing so that I can attach a lot of things to it by simple bolting. One thing I wanted on it was rope cleats for tiedown:
**Pic Coming Soon!**

Feel free to use and improve on the plans! I have some leftover angle iron and if someone wants a set of brackets to mount whatever but lacks the tools, I could make a set for probably $30 or so (painting extra, I hate painting...). Note these brackets can be used to mount just about anything you want, and can be customized for whatever bolt-on mounting you may need.
If anyone wants a copy of the master CAD file, just PM me for the file and a link to the software I made it in.
This is my first time attempting any fabrication with metal/steel so I'd really appreciate any comments or suggestions people could have! Please be kind though, I know my metal fab skillz are lacking...
Thanks to PaulJ for inspiration and "general look", I admit I kinda ripped him off. Please don't hurt me!
 Me likes!