

I finally attempted the drive belt replacement as part of a little preventative maintenance (66,300 miles !!) . The ONLY way I can see it being done is with a special tool designed to manipulate the Serpentine belt tensioner . . . I tried everything else; impossible access and leverage issues prevented normal tools (sockets, open ends, box ends, ratchets, breaker bars, ouji boards, etc.) from even getting close. :shock:
I ended up buying the tool at Pep Boys for 40 bucks; Lisle model 57900 http://shop.store.yahoo.com/bradystools/betoseli57.html
Purchased the belt from Majestic Honda (item #12 - $26.60)
http://www.hondaautomotiveparts.com...nt&catcgry2=2003&catcgry3=5DR+EX+4WD&catcgry4=KA4AT&catcgry5=A/C+++++COMPRESSOR
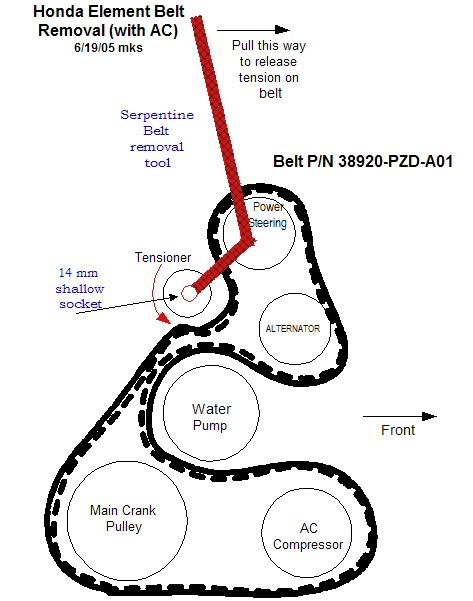
I don’t know why Honda doesn’t supply a belt routing diagram under the hood like most manufacturers so I made my own. I suspect because this removal is so tricky (and dangerous = missing fingers !!) that they don’t want DIY’ers messing with it. Nothing about it in the manual either, but here’s what you’re up against . . .")
![Image]()
(Sorry, I don’t know what it looks like without the AC option)
I ended up buying the tool at Pep Boys for 40 bucks; Lisle model 57900 http://shop.store.yahoo.com/bradystools/betoseli57.html
Purchased the belt from Majestic Honda (item #12 - $26.60)
http://www.hondaautomotiveparts.com...nt&catcgry2=2003&catcgry3=5DR+EX+4WD&catcgry4=KA4AT&catcgry5=A/C+++++COMPRESSOR
I don’t know why Honda doesn’t supply a belt routing diagram under the hood like most manufacturers so I made my own. I suspect because this removal is so tricky (and dangerous = missing fingers !!) that they don’t want DIY’ers messing with it. Nothing about it in the manual either, but here’s what you’re up against . . .
(Sorry, I don’t know what it looks like without the AC option)


