Element Sleep Setup
A collage of the actual in-use setup after a few weeks on the road (please pardon the clutter):
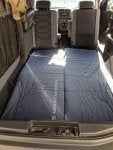
Sleeping
Cot legs are propped up on the Hefty containers in the rear and middle, and the front legs are on the folded-down passenger seat. I slept with my head at the rear of the Element.
This setup was very comfortable to sleep in. By the end of the 35-day trip, the cot legs had begin to deform the plastic bin lids in the middle and rear, and that made the sleeping the last couple of days not so great. A small panel of plywood on top of the bins would have fixed that easily and cheaply.
Reflectix panels cut to size and stuffed in the windows. Primarily for privacy, but worked superbly for keeping the Sun from turning the Element into an oven in the Southwest.
I do not have a photo of it, but I bought a 9" USB fan which was worth the investment. Already had a large USB battery pack, and it barely drained the 10k-mAh battery levels — even running all night.
Storage
Any gear I used frequently was stored in the bins under the cot and on top of the folder-back front passenger seat. As well as in the passenger-side footwell.
Food, water, eating, drinking, adventure gear, cooler and so on. You want all this stuff easily accessible without having to dig around in the back. Trust me.
Ventilation & Bugs
I also built mosquito screens for all the windows. But ended up only using the ones for the pop-out windows. I usually kept the Reflectix panels in all the windows for privacy and Sun-blocking, so the mosquito net panels were useless on the main door windows. However, I could use both the Relfectix and the mosquito net panels on the pop-out windows. I also preferred the security of sleeping with all the doors and main windows closed and the vehicle locked up.
The mosquito net panels were merely mosquito screening cut a few inches larger than each window opening, with small round magnets duct taped to the edges by folding a piece of tape around the edge and sandwiching the magnet in-between. Attached them using the magnets to the outside of the vehicle to the body panels surrounding the window openings.
I highly recommend making the mosquito screens. Keeping windows open for ventilation is a must, and so is keeping out the bugs — especially while you sleep.
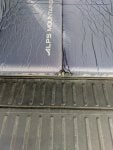
Canopy
Here is a collage of the custom canopy setup I devised:
Marine tarp suction cup bungees, a quality 8'x10' camping tarp, REI 8' tarp poles, and some good tarp cordage and tent stakes.
The tarp was more for emergencies, so I could hang out outside the vehicle in case of rain. That never happened on this trip. But I still set it up a few times for practice and to fine-tune the placement.
In hindsight, I would probably set up the canopy free-standing at any places I was planning on being at for a few days. That way, I could keep the canopy set up at camp, but still easily drive around to sight-see or go on daytime adventures.
At the least, a tarp set up that can be easily removed from the vehicle. I think another guyline on each pole in the setup in the photos would suffice. Then I could just pop off the suction cups, and reattach when back at camp.
I am parked in an odd spot at the campsite because it's essential to find the most level spot you can to sleep well.


") But nudge me, and I'll make it happen eventually.
But nudge me, and I'll make it happen eventually.

