Honda Element Owners Club banner

Stereo self-install (no cuts) with pics

40K views 30 replies 13 participants last post by  Toast Malone  
#1 · (Edited)
Been a while since I've been on here (since my Ridgeline key-mod thread) but I just got around to installing an after-market stereo in my 2005 E.

I took pics throughout the process to hopefully help other people through the process if they want to self-install as well. The only non-standard thing in this install is a modification of the AUX jack to accommodate a USB plug.

What stereo to buy


I purchased a Clarion CZ-500 for a few reasons:
- Bluetooth built in (phone calls, and for streaming music from my phone)
- Compatible with iPhone iOS4 (some 'iPod compatible' receivers don't work with the newest firmware)
- Rear USB plug (for a clean install and clean appearance, this was required for me)

For the price, it is a GREAT stereo. The geek in me REALLY wanted to to touchscreen navigation like our Prius, but I really don't need that in the Element. This one had the features I wanted at a reasonable price ($149 with install kit from Crutchfield).

What you need


Parts links go to installer.com for illustrative purposes, but you can buy them most anywhere (Crutchfield, Amazon, even Best Buy)

You'll need:
- Flat head screwdriver
- Phillips head screwdrivers (1 'big', 1 'very small')
- Crescent wrench (to disconnect the car battery)
- Wire strippers
- T-tap splices for 18-24 gauge wire (x2)
- Solderless RCA plugs - male (x5)
- Honda stereo wiring harness
- Double-din stereo mounting bracket (with pocket only if new stereo is single-DIN. If the new stereo is double-DIN, you don't need this)
- Antenna Adapter (on 2005 or newer)

If you buy from Crutchfield or SonicElectronix, they will include the double DIN adapter and the wiring harness. They may not include the antenna adapter though (Crutchfield didn't for me). Contact them to see if they will for you.

Pulling out the old stereo


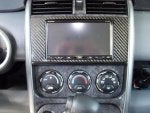
(NOTE: I forgot to take pics before removing the old stereo. Pretend the new stereo is the old one. Squint your eyes a little, make it blurry, and imagine big buttons and that awful green backlit display)

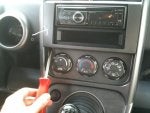
First, you'll need to remove the old stereo. Pry off the surrounding panel starting on the bottom left.

Image


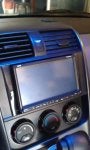
The metal clips can be pretty tough to pull off, so don't be too shy about it. Once you get both of the bottoms out, put your screwdriver on the top left under the lip and pry the tops off

Image


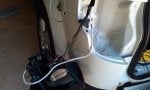
From there, remove the 4 screws holding the old stereo in.

Image


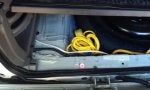
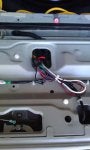
here is a shot of the empty stereo cavity.

Image
 
#2 · (Edited)
Preparing for installation


Now, if needed you will want to pre-mount your new stereo in the double-DIN adapter. It will be much easier to work with the stereo if you do this early.

I'll wait..

Make sure the screws are tight.

...

Done? OK.

On to the wiring...

Pull out your Honda wiring harness with the blue connector (I'll call this the "Car Harness") and the wiring harness that came with your stereo (I'll call this the "Stereo Harness"). If your stereo didn't come with a harness, you'll probably have wires coming directly out of the back of it. You'll wire directly to those.

You will hook up all of the non-speaker wires on the Car Harness to the corresponding wires on the Stereo Harness. Wire colors may or may not match up. Hopefully they do; they did on this stereo. Leave the speaker wires unconnected. The following picture shows the Car Harness (blue connector) wired up to the Stereo Harness, but the speaker wires are left unconnected:

Image


I used wire nuts to tie them together (later added electrical tape to ensure they stay on), but you can use crimp connectors or solder/shrink-tube if you want. I just like the wire nuts because they I had them laying around and I like bright shiny orange things.

NOTE: The Element has an amplifier which needs to be turned on for the speakers to be powered. You can bypass the built-in amplifier if you want (there are kits to do that), but this installation assumes you will use the built-in amplifier. As such, you need to make sure that the blue wire on the Car Harness is hooked up to the 'Amplifier turn on / Remote' wire on the Stereo Harness (usually blue or blue/white). If you get everything connected but you don't get any sound out of your speakers, chances are this blue wire is not hooked up correctly.

For the speaker wires, I'm going to use the line-level RCA plugs on the back of the stereo. To do that, I need to put RCA plugs on the speaker wires on the Car Harness. For that, I visited my local Radio Shack and picked up a couple of "Solderless Male RCA Connectors":

Image


You will connect an RCA plug to each pair of speaker wires on the Car Harness (blue connector).

To start, grab an RCA connector by the tip with a pair of pliers

Image


and then pull off the cover.

Image


Thread a pair of speaker wires on the Car Harness through the cover. Remember to do this step first for each pair. If you forget, you'll need to undo your connections in order to put the cover over the wires.

Image


The screw will hold the positive '+' wire, while the sleeve will connect to the negative '-' wire. In my case, the wires with the black stripe were negative while the non-striped wires were positive. Check your wiring diagram.

Unscrew the screw in the middle all the way, wrap the positive wire around it, then screw it back in. Make sure that NONE of the wire braids touch the metal sleeve (be VERY picky about this).

Feed the negative wire through the hole in the sleeve and wrap it around.

Use a pair of pliers to press down the 'clamps' to hold the wires in place.

Here is a finished connection:

Image


Now, they are Solderless, but if you are technically able to, drop a bead of solder on each wire for good measure. Not 100% needed, but recommended.

Pull the cover back up and over the connector. Here is a finished pair:

Image


Do this for each pair of speaker wires. Remember to put the cover on first before you put on the connector :)

Here are the finished Car and Stereo harnesses:

Image


One last thing to wire up: the subwoofer connector. The stereo I bought has 2 RCA line-level outputs for subwoofers. To use them, I took a length (about 8 inches) of small speaker wire (24-gauge) and put an RCA plug on the end. The wire with the white stripe goes to the outer sleeve, while the non-striped wire goes to the screw.

Image


Now we're ready to go to the car.
 
#3 · (Edited)
Actual installation


First, disconnect the negative cable on the car battery.

Now, place the stereo on top of the middle of the dash, back facing you.

Plug in the Car Harness to the blue plug in the car. Then, plug in the Stereo Harness to the back of the stereo.

Connect each of the speaker RCA connectors to the corresponding connector on the back of the stereo. Check your wiring diagram to make sure that you hook them up correctly.

Image


If you have a 2005 or later model, plug in the Antenna Adapter to the gray plug and the Motorola anntenna connector to the one in the back of the stereo. The blue wire on the antenna adapter ties to the 'other' blue wire on the back of the stereo.

Image


If you have an earlier model, you should just need to plug the antenna connector directly into the stereo.

For the subwoofer, locate the black connector with 2 red wires and 2 black wires going into it.

Image


Use 1 T-Tap splice on each of the red wires. The red wire with the white stripe is negative so that connects to the white-striped RCA connector wire (assuming you did as I did and connected it to the sleeve on the RCA connector). The red wire with the blue strip is positive so it goes to the non-striped RCA connector wire.

Image


Plug the subwoofer RCA connector into subwoofer connector on the back of the stereo.

NICE! Your basic wiring is all done. Reconnect your car battery, put your keys in the ignition and turn it forward 2 clicks. Turn on the stereo and make sure it functions as expected. If something doesn't work, turn off the car, disconnect the battery, and check your wiring diagram. If the stereo turned on but no sound came out, double check that blue wire on the Car Harness is connected to the correct blue wire on the back of the stereo.

If you don't have anything extra to put in, go ahead and place all the wires into the stereo cavity, slide the stereo into place, put back on the 4 mounting screws, then push on the panel. You're done!

For the stereo I bought, there are 2 other things that needed to be completed:
- Mounting the microphone for the bluetooth cell phone connection
- Mounting the rear USB plug.
 
#4 · (Edited)
Mounting the extra stuff


For the microphone, I decided to mount it on the driver's side, just to the left of the stereo and just below the dashboard gauges. There is a little nook there that is perfect and a couple of test phone calls showed that my voice was picked up fine.

I drilled a hole upwards so that it wasn't visible, then ran the microphone cable through it to the back of the stereo (there is a 3.5mm plug in the back of this stereo for it).

Here is a night-time shot with a flashlight shining on the microphone. In the daytime it isn't even noticeable:

Image


I decided the USB plug would replace the AUX line in on the passenger side of the dashboard. To get at it, you must first pop out the 12V power plug and THEN pop out the AUX plug. Both are pretty stubborn so it will require a bit of effort to pry them out. To help get them out, you can remove the glovebox (pry off the bottom cover under the glovebox, then remove the 2 screws that hold the glovebox on), and then help to pop each out with your fingers from behind.

Disconnect the wiring harness from the back of the AUX plug.

Image


Use a screwdriver to remove the back of the plug

Image


Then pull out the little circuit board inside.

Image


I outlined the USB connector on the front of the panel and then drilled small holes along that outline. If you are handy with a dremel tool, you could probably just cut it out directly.

Image


Then I used some needle-nosed pliers to pull out the cutout.

Image


Use a file or a utility knife to smooth the edges.

Now, run the USB cable from the back of the stereo through the AUX plug hole. Glue the USB plug into the new hole in the AUX plug. I used JB Weld which is a VERY strong adhesive (I don't want it going anywhere and it sets up in 4 minutes), but other adhesives would work (crazy glue, adhesive caulk, just not Elmer's Glue).

Image


After the glue is COMPLETELY dry, push the now-USB plug into its opening, then push the 12V power into its opening.

Image


That finished my install.

Image


(white cable is my iPod/iPhone cable)

Special thanks to everybody here who asked questions about installing stereos. I poured over a lot of content before doing the install. In particular, I found these threads invaluable:

http://www.elementownersclub.com/forums/showthread.php?t=3065

http://www.elementownersclub.com/forums/showthread.php?t=52097

http://www.elementownersclub.com/forums/showthread.php?t=42074
 
#6 ·
Good job. Love the all the pics!!!

I have on suggestion for ya. Do NOT use a screwdriver to pull of the U shaped
piece that goes over the radio!!!! Here is a pic of how I take mine off. You
just need some blue painters tape or some masking tape. Tape it exactly how
I have it in the picture, and then hold the bottom of the tape to the cover
with one hand while pulling on the tape with the other. Do one side at a time
and the cover will pop off with NO scuff marks!!!!

Image
 
#7 ·
Good job. Love the all the pics!!!

I have on suggestion for ya. Do NOT use a screwdriver to pull of the U shaped
piece that goes over the radio!!!! Here is a pic of how I take mine off. You
just need some blue painters tape or some masking tape. Tape it exactly how
I have it in the picture, and then hold the bottom of the tape to the cover
with one hand while pulling on the tape with the other. Do one side at a time
and the cover will pop off with NO scuff marks!!!!
That's really freaking clever! I had to find a VERY thin screwdriver to get under into the crack without scuffing the trim. I'm putting the tape idea into my notes :-D
 
#8 ·
This is fantastic!

I have also been poring over the threads in preparation for my upcoming install. I have pretty much figured this out, but if this thread had been up from the beginning, I'd have been done already!

As it is, my HU arrives next Tuesday- so off I go.

Aside from a different HU (wanted that built-in GPS) the only thing I did differently was getting the Metra 70-1725 unit from Amazon- I figure the fewer connections I make myself, the better this thing will work!

Again- nice work, and thanks for all the details. Seriously deserves a sticky right at the top!
 
#9 ·
Aside from a different HU (wanted that built-in GPS) the only thing I did differently was getting the Metra 70-1725 unit from Amazon- I figure the fewer connections I make myself, the better this thing will work!
Thanks for the kudos!

Crutchfield included the harness that I wired up (without the RCA's) for free so I ran with it.

I saw that harness (Metra 70-1725) on installer.com, Crutchfield, and SonicElectronix, but each place called it something different (amplifier bypass, Acura harness, etc..) and I wasn't sure if it would fit. Looking now, it seems that would be a better, pre-fab'ed option.

Good luck with the install and post some pics when done!
 
#11 ·
while skimming thru i saw no mention of your use of wirenuts to connect the radio harness to the aftermarket harness. this is a no-no in automotive applications. especially since you mentioned soldering the rca connectors (which is the best way you can connect wire in a vehicle). other than that nice job.
 
#12 ·
while skimming thru i saw no mention of your use of wirenuts to connect the radio harness to the aftermarket harness. this is a no-no in automotive applications. especially since you mentioned soldering the rca connectors (which is the best way you can connect wire in a vehicle).
Can you expand on that a little? I haven't had issues in the past with it (heat, shaking off, etc..) on other car-related projects, but I'm open for being told that I did something very wrong :)

other than that nice job.
Thanks!
 
#16 ·
The new stereo has RCA line-level outputs on the back of it that can run directly to the built-in Element stereo amplifier.

The new stereo also had 2 sub-woofer RCA line-level outputs, one of which was connected to the existing sub-woofer wires to use the built-in amplifier as well.

You can bypass the built-in amplifier and install your own or depend on the stereo to drive all of the speakers if you want. The use of RCA's just simplifies the process.

Also, Crutchfield sent me the wiring harness without RCA plugs already built-in. To save a LOT of work, you can get one of these:

http://www.installer.com/item/display_item.php?it=70-1725
 
#18 ·
So in order to use the stock amp to drive the speakers other than the sub (I am losing the stock sub all together in favor of an aftermarket sub) do you have to use the RCAs? Or could you use the wires from the harness?

Is that the right harness you linked to even though it says it's for a 02 RSX?

Thanks for your help!
I used them because the stereo I bought had line-level (pre-amp) RCA's on it. If your new stereo doesn't have RCA's on it (it only has powered outputs), I'm not 100% sure what to do. Check the links at the bottom of my original posts to read a couple of other threads about stereo installs.

If you're replacing the stock amplifier with an aftermarket one, I'm REALLY unsure of what to do :-/

The link to that harness should be correct. If you look over on the left-hand side, it lists other vehicles for which the harness will work.
 
#19 · (Edited)
Okay, I have the Metra 70-1725 harness and I have mated it to my aftermarket HU. If my HU has subwoofer RCA outs, do I need to use them, or will the RCAs on the Metra harness also send a signal to the subwoofer channel? If I do need to use the subwoofer outs on the HU, what is the easiest method to do this? Thanks for reading.

EDIT: It looks like I need the sub adapter from the 70-7863 kit and that I will need to order that kit since it won't be sold separately. Yoda says they are in stock and shipping, but I can't find any online retailer that doesn't say "call" or "coming soon." Anyone have a link?
 
#20 ·
I was thinking: If I use the 70-1725, I have line-level inputs going to the factory amplifier, so would it be a bad thing to just use quick splice connectors at the input harness to the amp and splice one front and one rear channel to the subwoofer input on the amp? If I am thinking about this correctly, it should provide a non-fading, line-level input to the subwoofer channel while bypassing the sub harness. Let me know if I am off on this, because I want to get my stereo installed ASAP and it would be nice if I could skip fabbing a sub harness. I have a call in to ASAP in Philly about the new all-in-one Metra harness but they won't have a price/availability for me until Monday. I also already have the speaker harness and don't need the AUX adapter, so I would be wasting a lot of money to get the sub harness.
 
#22 ·
Yeah, I went to Radio Shack today and bought the supplies. It was all cheap, but it adds up. It would probably have been cheaper to get the new Metra harness, but no one has it and I couldn't get a straight answer on when it will be available. Hopefully I won't have any issues fabbing the sub harness. On the plus side, I found a phono patch cable that already has the positive and negative run next to each other like speaker wire instead of coaxially so it should be very easy to work with. It was $5.
 
#24 · (Edited)
That's exactly what I did. I got the 1725 from Amazon but I wasn't sure what to do about the sub harness. I got it installed today and it sounds great, no level problems that some have reported with the sub. The only thing that went wrong was with the lights. I didn't know which orange wire to attach to the harness, so I spliced them together thinking it would just be a 12v current flowing through them and that with both hooked up I would be covered. When I turned the lights on, the stereo lights dimmed as they should but I heard some feedback. I turned the lights off but I think the lights on the stereo stayed dim. Nothing else is affected, but I think I fried something in the stereo by splicing those orange wires together. That phono patch cable is perfect for fabbing the sub harness. I tried the painter's tape idea to get the trim piece off, but it didn't stick at all. I upgraded to duct tape to no avail. I ended up pulling out the shifter trim piece, pulling off the whole surround starting from the bottom and removing the trim piece that way. It was a lot easier and there's no risk to the trim piece. The only thing to watch out for is the harness that powers the airbag off light on the top. The Metra dash kit I ordered came with a replacement u-shaped trim piece anyway, so if I did scratch it it wouldn't matter unless I reinstalled the factory stereo. Update to the orange wires: DO NOT splice the illumination wire to the dimmer wire! I blew a fuse under the hood (it is labeled 'small light' in the diagram). On my radio harness, the illumination wire has a white stripe, but on the Metra harness it doesn't, so definitely match up function, not color.
 

Attachments

#27 ·
That looks like one from an 06-prior as it isnt as tapered as the 07-up ones are. It will fit the dash, but the 07-up radio has a different shape so it wont fit correctly against it. What are you trying to do?
 
#28 · (Edited)
Sorry for changing the topic of this thread :oops: I'm not happy with my install and was going to pick up the same molding for my E and do it over. The top part of the molding isnt sitting flush with the console and I need to redo the cutout to be straighter. I noticed in some other threads that their molding was different, didn't have the raised portion on the bottom. I think it looks cleaner. (The gap around the unit is necessasry, because the faceplate is removeable.). I plan to replace the carbon fiber vinyl with real ones and put it also around knobs.
 

Attachments

#29 ·
My stereo effort with backup camera.

When I purchased my 2010 Honda Element I did not get the radio I wanted so I resorted to doing it myself. I purchased a Pyle PLDN74BTi with Pye camera. Not being a car guy in the least I also purchased a cordless adapter for the backup camera. This is the end product and I am very pleased. I ended up installing the camera above liscense plate which allowed room for the remote sender. Bottom line....I need a car to suit my needs.....not to admire. I have a video as well if your interested....too large for the forum.
 

Attachments

#30 ·
I ordered the below trim for my 2004 E from Majestic Honda item #
77255-scv-a01za and it doesn't fit! I have the stock radio. The only reason why
I wanted to replace mine is because I had some glue residue on it. When I
compare the 2 pcs the new one is off by about an 8th of an inch between the 2 posts.
Basically the radio won't fit between them. Any suggestions? Any one has one
clean that wants to sell for couple bucks?
 

Attachments