Honda Element Owners Club banner

Painting the Brake Caliper: A Weekend Modification

12K views 31 replies 15 participants last post by  Legioss  
#1 ·
This past weekend, I finally got around to painting my front and rear brake calipers. I accomplished this task over two days. What do you expect; I only had one pair of jack stands. This also meant that I had to purchase two G2 Caliper Paint Kits.

How I did it:
Required Materials (minimum)
· Floor Jack
· 2 Jack Stands (minimum)
· Wheel Chocks
· Steam Cleaner
· Disposable Gloves
· 2, G2 Caliper Paint Kits-Red (www.g2usa.com)
· Wire Brush, Small Wire Brush, Toothbrush
· Small hobby paint brushes
· Blue Painters Masking Tape
· Extra Brake Cleaner

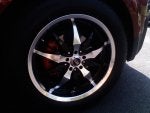
Painting the Front Calipers
Start off by finding and working in a good, well lit and ventilated area. My garage worked fine. Next, engage parking brake, loosen all lug nuts, and place wheel chocks at rear tires. This will prevent car from rolling backwards.

 
#2 ·
Next, proceed to jack up the Element and place on jack Stands. Please use caution while doing this. After lifting the Element, I left the jack at the center point for extra safety.


Next, remove all lug nuts and wheels. You now will see the front brake calipers.


#3 ·
Cleaning the Caliper: You will notice rear and front brake calipers. With a large brush, remove visible brake dust. Proceed to steam cleaner to clean the caliper, then wire brush. Steam once again; then, end up using brake cleaner with extra can of brake cleaner. Let dry, and then use brake cleaner from G2 Caliper Paint Kit to do final cleaning of calipers. A hard toothbrush should be used to make sure all grease and dust is removed, and then a final spraying with the provided cleaner. Use Kit Brake Cleaner at least three times. You will want clean calipers for painting.


#4 ·
Next, using painters tape, mask off areas you do not want painted. At this point, I decided to paint the front of the calipers and not the rear portions. In my opinion, you see more of the front of the caliper and not the rear. Most will disagree, but that is okay.

Mixing the Paint: The G2 Kit consists of paint and a reactor. Shake the can for about a minute, remove top and stir. Next, add reactor. Stir for a couple of minutes. Place top back on paint can and shake for about another minute. Let paint sit for five minutes to let paint react. Open can, stir once again. You are now ready to paint. Note that you have about 4 to 6 hours to use paint before as it starts to harden and is unusable.

 
#5 ·
Painting the Calipers: I used the brush provided with the kit to paint all the main surfaces. I painted thin coats. The first coat will look a little rough. Do not despair; additional coats will round out everything. I also used a smaller paint brush to paint the tighter areas. After first coat is completed on one side, repeat on opposite side of your Element. Wait about 15 minutes and start painting process again for the second coat. Repeat with a third coat. Now, being me, I decided to do a fourth coat. Over kill, maybe, but I wanted to make sure I covered everything that needed to be covered with paint. Wait about 15 minutes and touch-up if needed.


After four coats and two hours for the paint to dry and set; after removing the masking tape, you get this:


#6 ·
I even painted the washer plate that is visible from the passenger side front caliper.


Replace the front wheels on your Element. Be careful not to chip paint. According to paint instructions, let paint cure for 24 hours before you drive your Element This is what you get:

 
#7 ·
Painting the Rear Calipers
Using the same instructions and process as with the front calipers, you will achieve the following results for the rear calipers:


Epilogue
There are differing views on painting, spray painting, and powder coating the calipers. I decided on the G2 method. This works best for me. Painting all four calipers can be done in a day if you have four jack stands, and one paint kit. Please note; I did not have two sets of jack stands. I painted the front calipers on Saturday, and the rears on Sunday. I wanted to take my time and paint over the weekend Due to this; I needed two caliper paint kits. I purchased the paint kits, local, from Performance Products in Van Nuys. I paid $39 for each kit.

Also, I did not do a good job of masking off on some parts. I got a little paint on the front of the brake pads and clips. My paint technique needs work. If I had to do it over again (and I don’t), I would do a better job of masking off parts. In the end, make sure all of your parts are put back on and that all lug nuts are properly tightened and torqued.

I also have to say the following: If you attempt this mod, your results, I am sure, will differ from mine. I am sure of this. Please read and follow the instructions in the kit. Good luck if you attempt this modification.
 
#8 ·
At a wheel warehouse where my boss got his rims, they did the paint job for him. He drives a Mazda MX-5. Silver. He got some black Momo's with a chrome lip. The boys there did the paint job before they put the tires and and he drove it right away. All I know is that it was some sort of spray can and his calipers are now black.
 
#9 ·
Looks great! Very nice write up and great pics. Thanks for taking the time to document it.:) Drew:)
 
#10 ·
You make me feel ashamed of myself. All I did was buy some engine spray paint for it's high heat tolerences. Then I removed the wheels used masking tape and newspaper to sheild everything that I didn't want to be silver and sprayed three to four coats that each took 5 minutes to dry. I'm sure yours will last much longer than mine!
 
#18 ·
The paint system I used will allow you to mix paint. G2 does make a green caliper paint you could mix. The G2 web site had a write-up about someone who mixed paint to match a color no longer available.
 
#20 ·
true, but it's not the same. the brush type is very thick and stay shiney way longer. alomost shiney plastic like. wiping it clean to a shinely like new look is very easy too. auto paint needs a clear coat to have the same slickness. i used the duplicolor. bought it for 14 bucks and the can is still full. 3 coats on brakes, touch up, painted some misc stuff.
 
#21 ·
so, i am thinking of doing this, BUT torn on colors. my car is pretty much black and grey/silver. the only color u can really see from the exterior r the taillights. SO, should i do red? BUT, the teins and sway bars r green so should i go for green? suggestions please and thank you.
 
#31 · (Edited)
Painted mine last week

Finally got this mod done last week. Took my sled to to the ISP garage where our mechanic put it up on the lift. I cleaned the calipers and masked them off and then went to work. I love the results and it really makes the wheels pop! The other thing that is wild is how my rim catches the flash of red. Looks really nice and I'm glad I finally got this mod done.
Another thing is, this will make my potential buyers look at the Precious and say that I put attention to detail and that this ride would be worth having.
Thanks for the info JSM00thJAz3! Had I kept my SMM Element I think I would have gone with the gold, only if I had some black mesh wheels. I think it all depends on how you're rollin'. All about the accent.
 

Attachments

#32 ·
I got a pulse! This thread is still alive!

FYI, G2 has now started a mailing list, and have a FB page. They offer occasional discounts that are actually worth something. For example, this weekend only they are offering 25% OFF any custom color. I wish my money wasn't already spoken for.

02/03/12->02/06/12: 25%Off code: 25OFFCUSTOM

No, I don't work for G2, I just hate it when people tell me about deals AFTER I buy. This is your friendly announcement to avoid that kind of frustration.